← 心拍のつなぎかたへAll connection routes
HEART RATE SETUP
iPhoneでつなぐ(PulseOSC)iPhone Route (PulseOSC)
iPhoneアプリPulseOSC(¥200買い切り)で、Apple WatchやBluetooth心拍計の心拍をWi-Fi経由でVRChatへ直送します。クラウド不要・アカウント登録不要。所要10分。
The PulseOSC iPhone app (¥200, one-time) sends heart rate from an Apple Watch or Bluetooth monitor straight to VRChat over Wi-Fi. No cloud, no account. About 10 minutes.
0用意するものWhat you need
- iPhone(iOS 16以降。Bluetooth心拍計・AirPodsを使う場合はiOS 26以降)
- 心拍のソース — Apple Watch / AirPods Pro 3 / Powerbeats Pro 2 / Bluetooth対応の心拍計(例: Polar H10 / COOSPO HW9 / Mi Bandシリーズ)
- VRChatを動かしているPC(iPhoneと同じWi-Fiにつながっていること)
- PIXEL PULSEを入れたアバター(導入はこちら)
- An iPhone (iOS 16+; iOS 26+ for Bluetooth monitors / AirPods)
- A heart rate source — Apple Watch / AirPods Pro 3 / Powerbeats Pro 2 / a Bluetooth monitor (e.g. Polar H10 / COOSPO HW9 / Mi Band series)
- The PC running VRChat, on the same Wi-Fi as the iPhone
- An avatar with PIXEL PULSE installed (setup guide)
1PulseOSCを入れるInstall PulseOSC
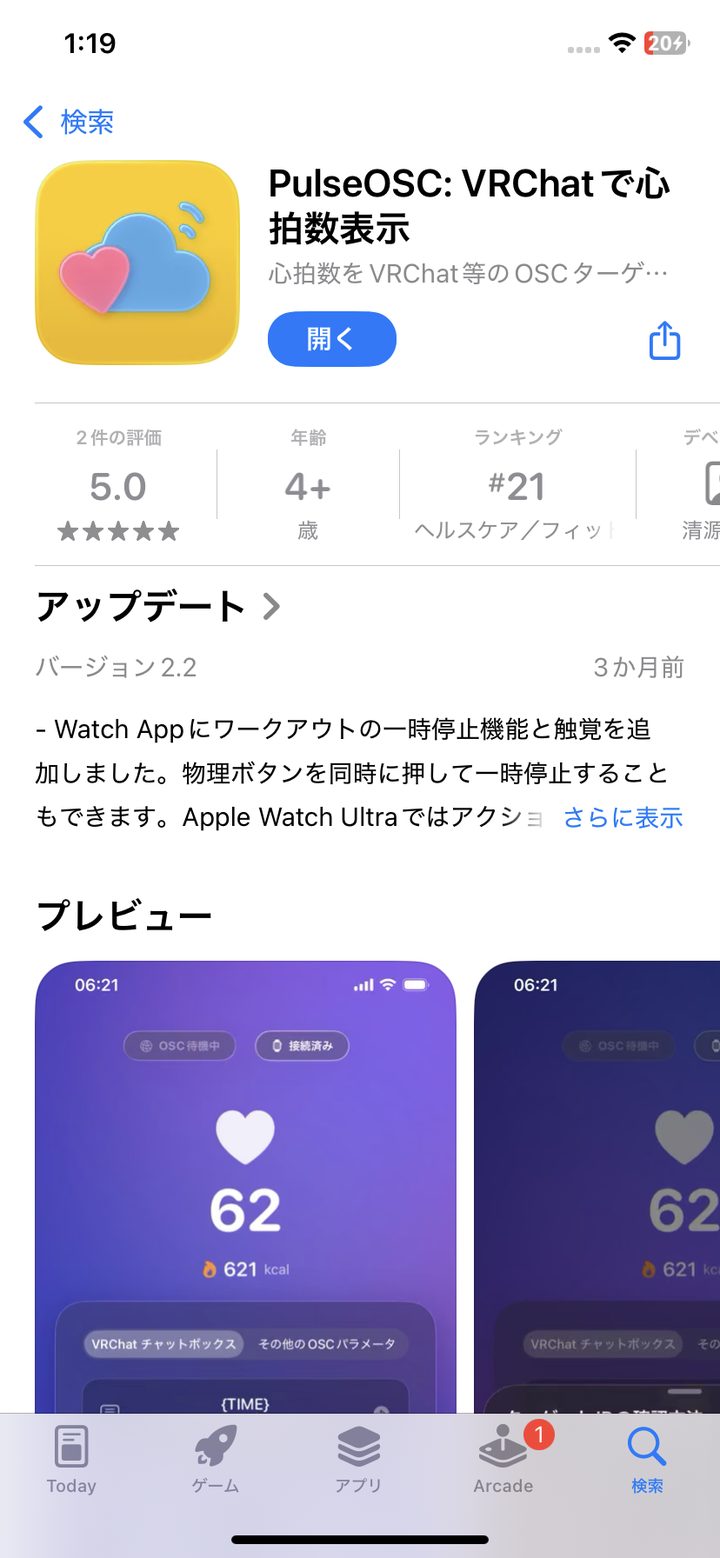
App Storeで PulseOSC(¥200)を購入してインストールします(ストアで「PulseOSC」と検索してもOK)。
Buy and install PulseOSC (¥200) from the App Store (or just search for "PulseOSC").
 PCでこのページを見ている場合は、iPhoneのカメラでこのQRコードを読み取るとストアページが開きます。Reading this on a PC? Scan this QR with your iPhone's camera to open the store page.
2心拍のソースをつなぐConnect your heart rate source
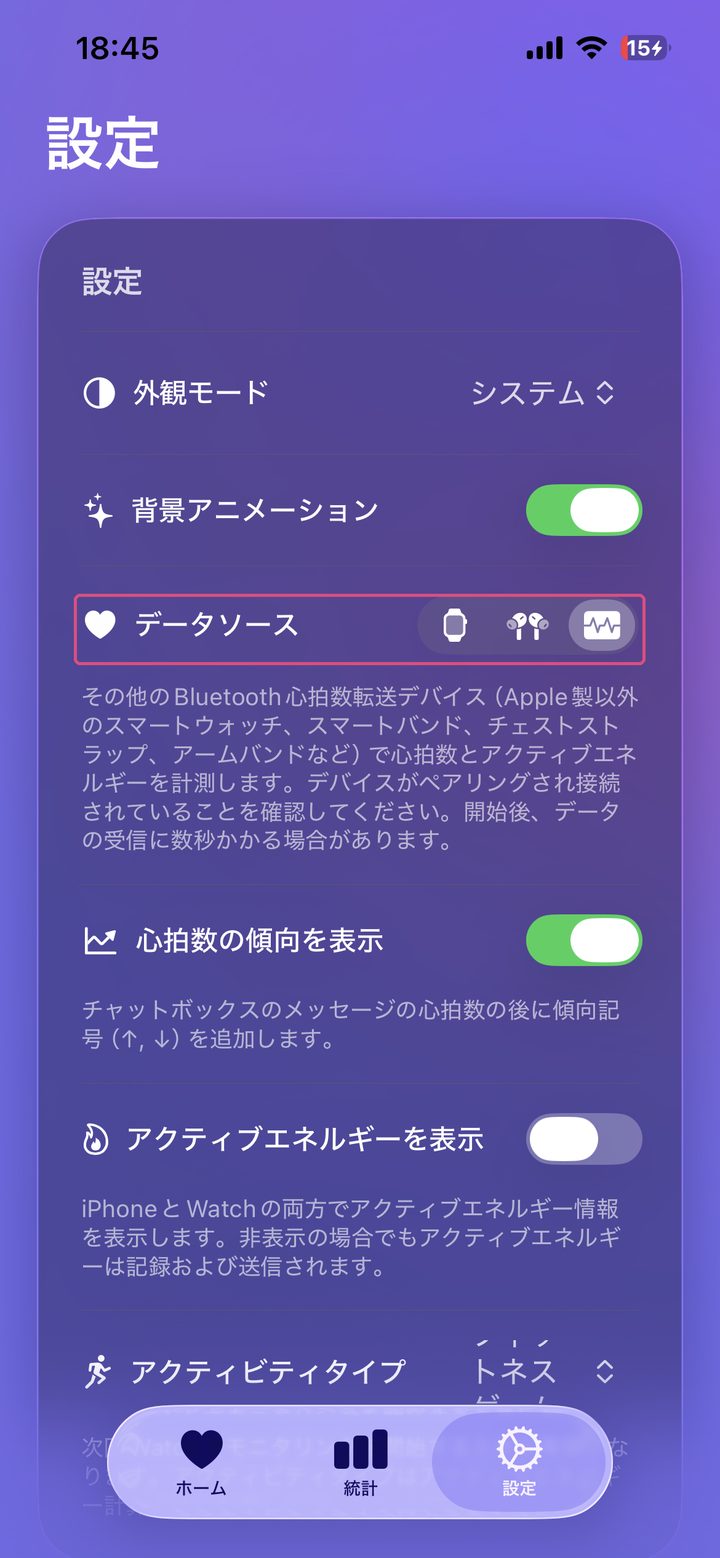
「設定」タブの「データソース」で、使う機器を選びます。
- Apple Watchの場合 — ウォッチのアイコンを選び、ウォッチ側のPulseOSCアプリで計測を開始します
- Bluetooth心拍計の場合(iOS 26以降) — 心拍計のアイコンを選びます。心拍計は事前にiPhoneとペアリングしておいてください
- AirPods Pro 3 / Powerbeats Pro 2の場合(iOS 26以降) — イヤホンのアイコンを選び、装着します
Open the "設定" (Settings) tab and pick your device under "データソース" (data source).
- Apple Watch — pick the watch icon and start a measurement in the PulseOSC watch app
- Bluetooth monitor (iOS 26+) — pick the monitor icon; pair the monitor with the iPhone beforehand
- AirPods Pro 3 / Powerbeats Pro 2 (iOS 26+) — pick the earbuds icon and put them on
3送信先のPCを設定するPoint it at your PC
まず、VRChatを動かしているPCのIPアドレスを調べます。
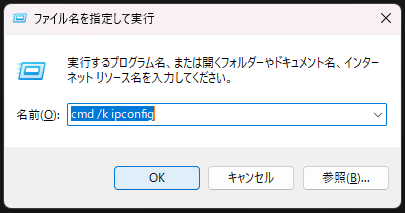
- キーボードの Win + R を押します(小さな「ファイル名を指定して実行」窓が開きます)
- 次の1行を貼り付けて Enter を押します:
cmd /k ipconfig
First, find the IP address of the PC running VRChat.
- Press Win + R (a small "Run" box opens)
- Paste this line and press Enter:
cmd /k ipconfig
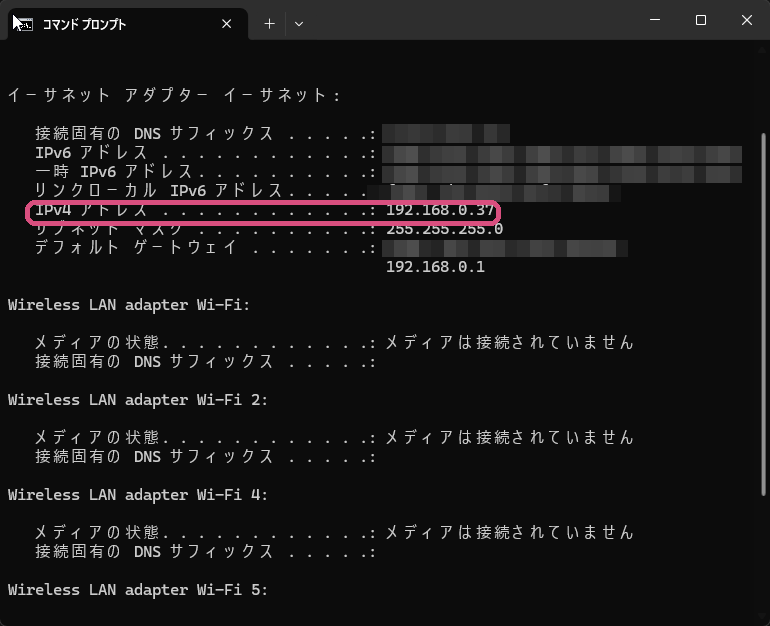
黒い画面に出てくる「IPv4 アドレス」(192.168.… のような数字)がPCのIPアドレスです。
In the black window, find "IPv4 Address" (something like 192.168.…) — that's your PC's IP.
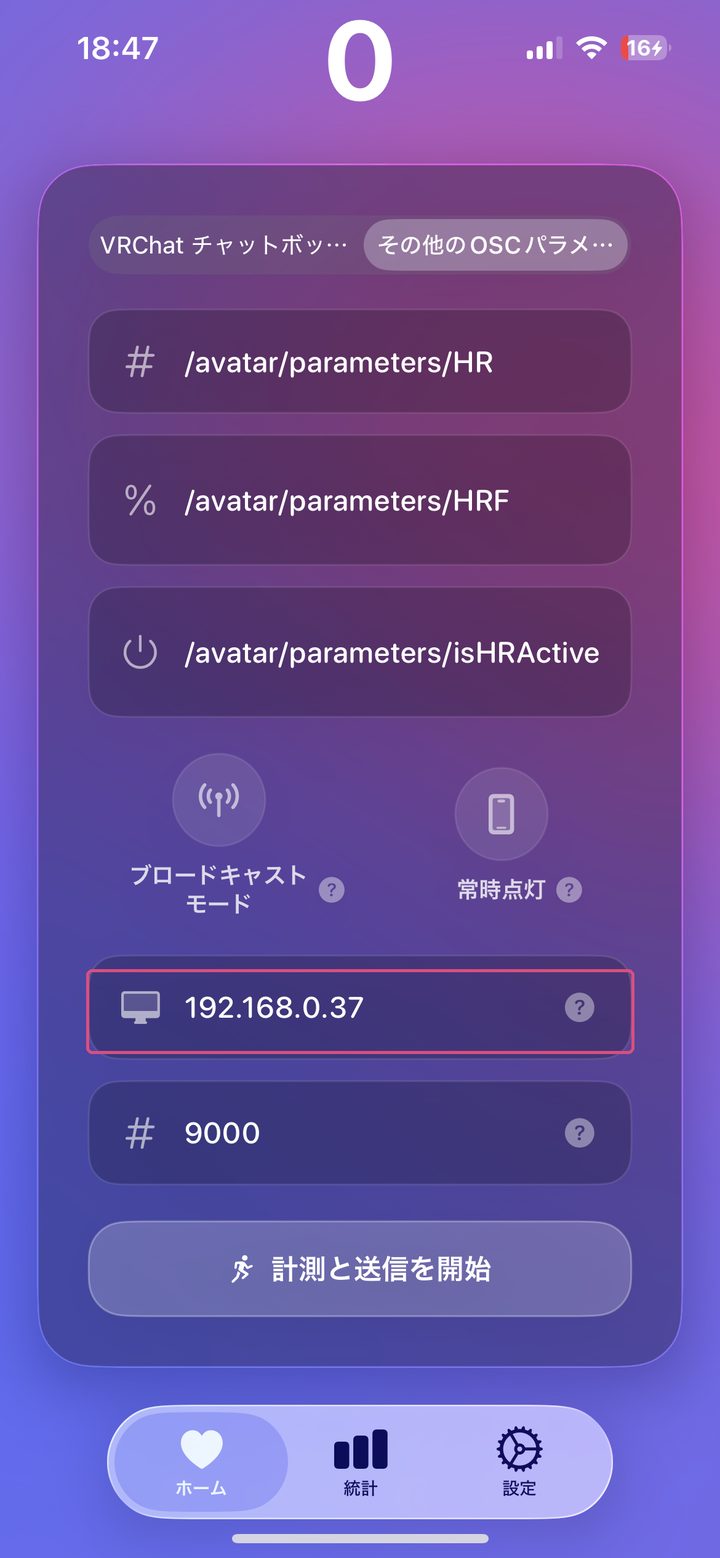
つづいて、PulseOSCの「ホーム」タブで送信先を入力します。
- 送信先のIP(モニターのアイコンの欄)— いま調べたPCのIPアドレス
-
ポート —
9000のまま - OSCパラメータは変更不要です(初期設定の
/avatar/parameters/HRをPIXEL PULSEがそのまま読みます) - 最後に「計測と送信を開始」を押します
Then, on PulseOSC's "ホーム" (Home) tab, enter the destination.
- Destination IP (the monitor-icon field) — the PC's IP address you just found
-
Port — leave it at
9000 -
No parameter changes needed — PIXEL PULSE reads the default
/avatar/parameters/HRas-is - Finally, tap "計測と送信を開始" (start measuring & sending)
4VRChat側でOSCを有効にするEnable OSC in VRChat
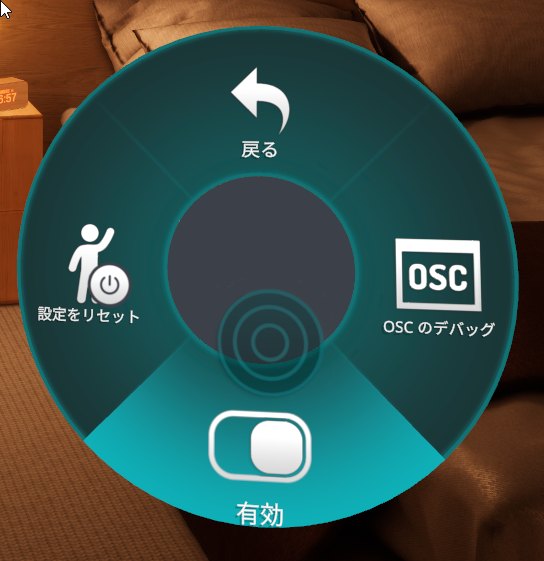
VRChatの中で、アクションメニュー(Rボタン/右スティック押し込み等)→ Options → OSC → 有効 をONにします。最初の1回だけでOKです。
In VRChat, open the Action Menu → Options → OSC → Enabled and turn it ON. You only need to do this once.
5できあがりDone!
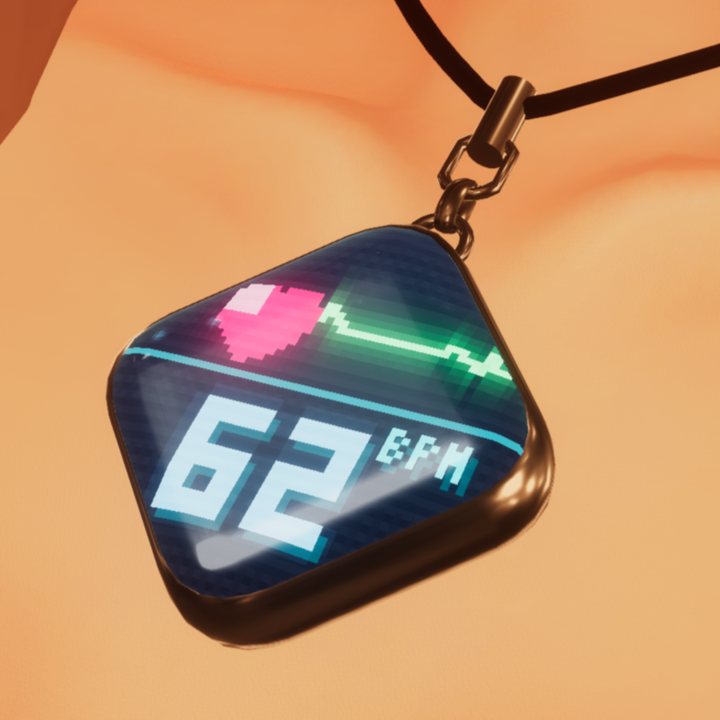
心拍が届き始めると、ペンダントは自動で心拍ページに切り替わります。胸元で数字が動いていたら完成です。
As soon as heart rate arrives, the pendant switches to the heart rate page automatically. If the number on your chest is moving — you're done.
?うまくいかないときIf it doesn't work
- データソースにBluetooth心拍計が出てこない → ページ上部の注意のとおり、iOS 26以降が必要です(設定 → 一般 → 情報 でiOSバージョンを確認)
- アプリに数字が出ていない → 心拍計の装着・電池を確認。他のアプリやウォッチが心拍計を掴んでいないかも確認
- iPhoneとPCが同じWi-Fiか → ゲスト用SSIDや「プライバシーセパレーター」がONのルーターだと、端末同士の通信が遮断されます
- Windowsファイアウォール → VRChatをプライベートネットワークで許可していないと受信できません
- それでもペンダントに出ない → VRChatのOSCページで「設定をリセット(Reset Config)」を押してアバターを選び直してください
- もっと詳しく → 導入ガイドのよくある質問
- No Bluetooth monitors in the data sources → as noted at the top, this needs iOS 26+ (check Settings → General → About)
- No number in the app → check the monitor is worn and charged, and that no other app or watch is holding it
- Same Wi-Fi? → guest SSIDs and routers with "AP isolation" block device-to-device traffic
- Windows Firewall → VRChat must be allowed on private networks
- Still nothing on the pendant → press "Reset Config" on VRChat's OSC page and re-select your avatar
- More details → the FAQ in the main guide