HEART RATE PENDANT
PixelPulse
ペンダント型の心拍ディスプレイPendant-style heart rate display
ペンダントの導入・位置調整と、画面のカスタマイズを案内します。心音・パルスタトゥーの設定もこちら。Set up and fit the pendant, customize the display, and configure heartbeat sound and the pulse tattoo.
導入手順を見る →Installation steps → 心拍のつなぎかたHeart rate setup
できることWhat it does

あなたの心拍を伝える方法が3つあります — 胸元のペンダント、胸から鳴る心音、頬で光るパルス。どれもExpression Menuから個別にON/OFFできるので、その日の服装や気分に合わせて組み合わせられます。ネックレスを消して、パルスだけを着けることもできます。
There are three ways to show your heartbeat — the pendant on your chest, the heartbeat sound from inside it, and the glowing pulse on your cheek. Each one toggles independently from the Expression Menu, so you can mix them to suit the outfit or the moment. You can even hide the necklace and wear only the pulse.
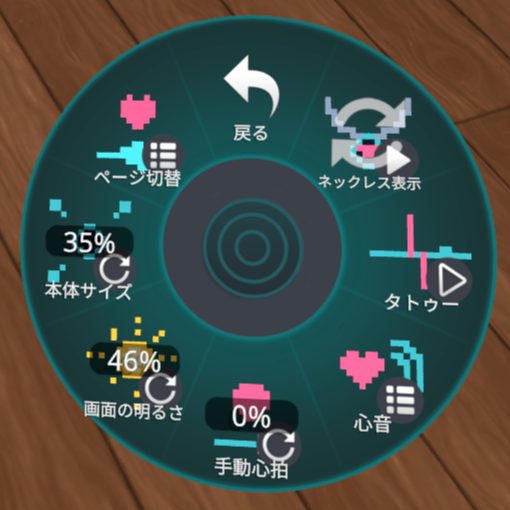
Expression Menuの「PIXEL PULSE」。すべての機能はここから切り替えます。
The "PIXEL PULSE" Expression Menu — everything is toggled from here.
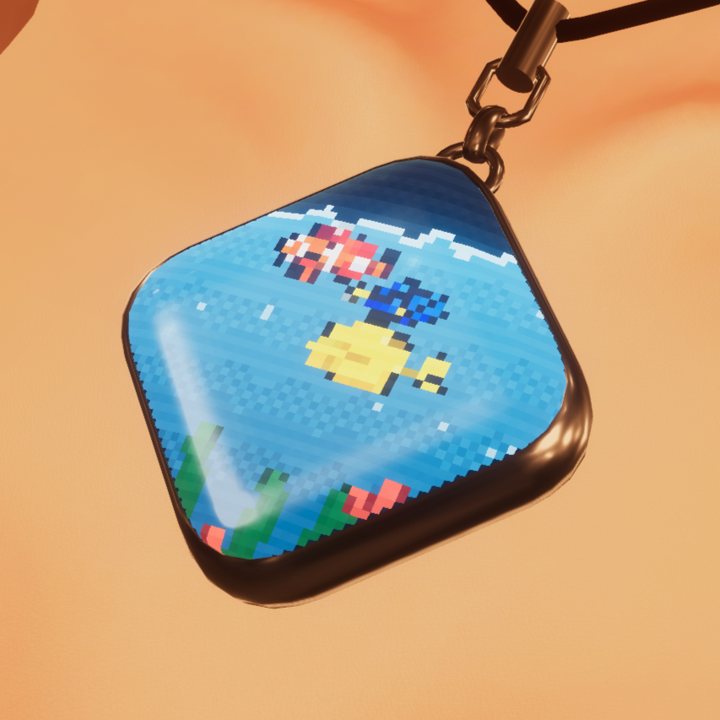
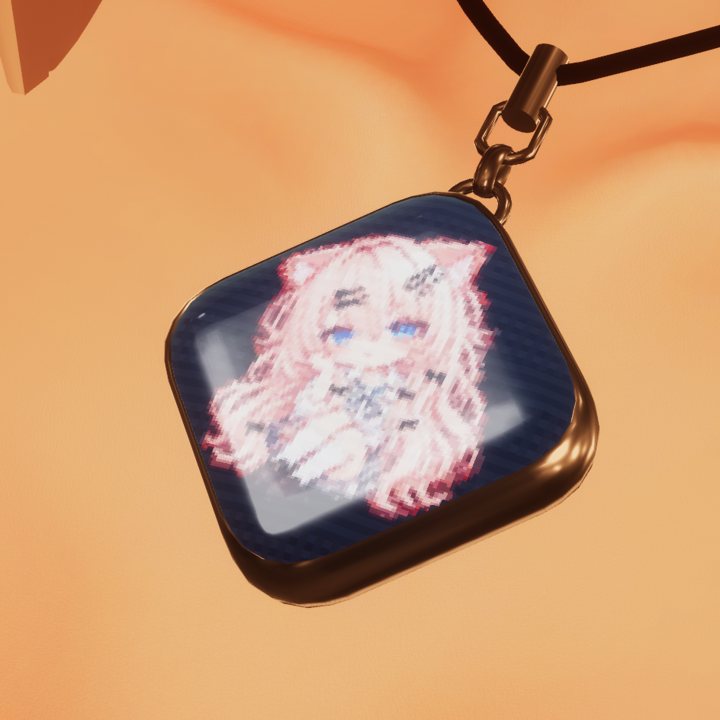
♥胸元のペンダント — 4つの画面The pendant — four screens
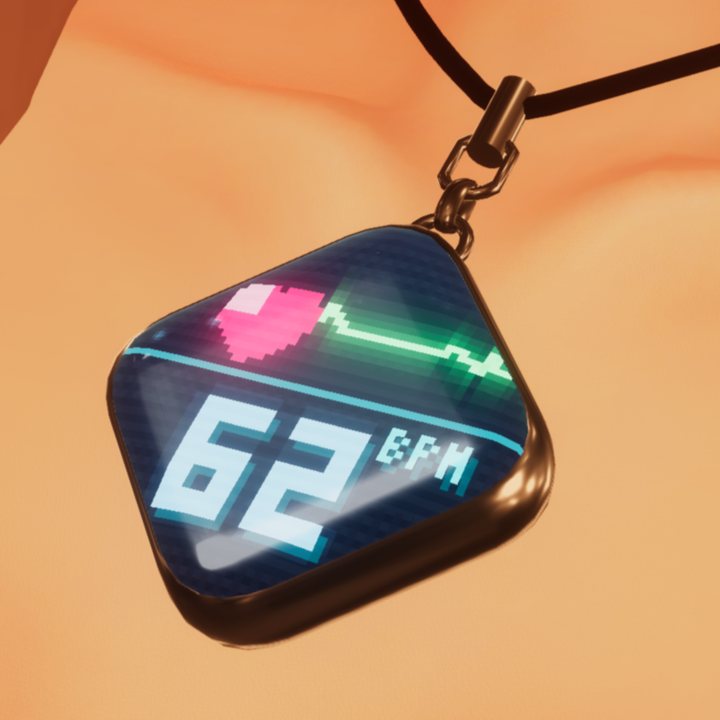
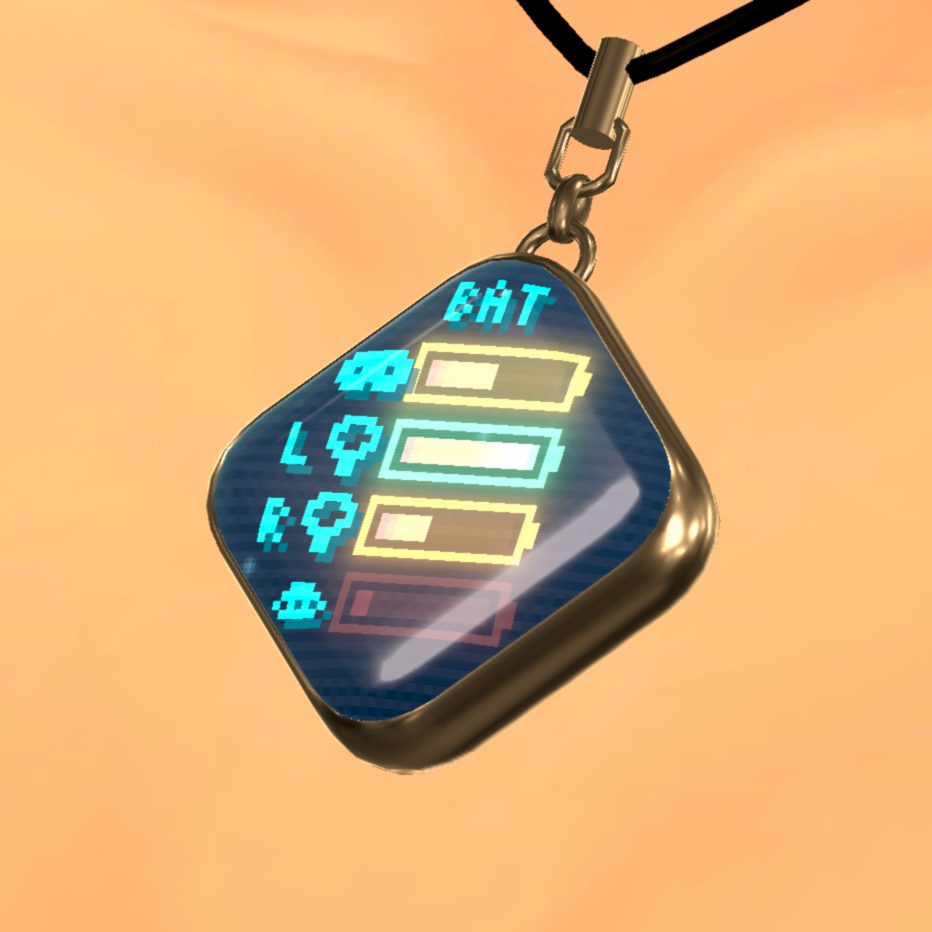
ペンダントを掴んで引っ張るか、Expression Menuから画面を切り替えます。引っ張り切替のときは、データが届いていないページを自動でスキップします(メニューからはどのページも選べます)。心拍が届き始めた瞬間は自動で心拍ページに戻ります。
Switch pages by grabbing and tugging the pendant, or from the Expression Menu. When switching by tugging, pages with no data are skipped automatically (from the menu you can select any page). The moment heart rate data starts arriving, the pendant jumps back to the heart rate page.
♥心音Heartbeat sound
心拍に合わせて、胸の中から「ドクン」と鳴ります。心拍が速くなれば、鳴る間隔もそのまま速くなります。
届く範囲はメニューのラジアルで密着(15cm)から12mまで調整できます。既定は約25cm — 抱きしめた相手にだけ聞こえる距離です。また既定では自分には聞こえず、周りの人にだけ届きます(「自分にも聞かせる」でONにできます)。
A soft thump from inside your chest, in time with your pulse. The faster your heart beats, the faster it sounds.
The audible range is a menu radial, from intimate (15 cm) out to 12 m. The default is about 25 cm — close enough that only someone hugging you can hear it. By default you do not hear it yourself, only the people around you do (turn on 自分にも聞かせる if you want to).
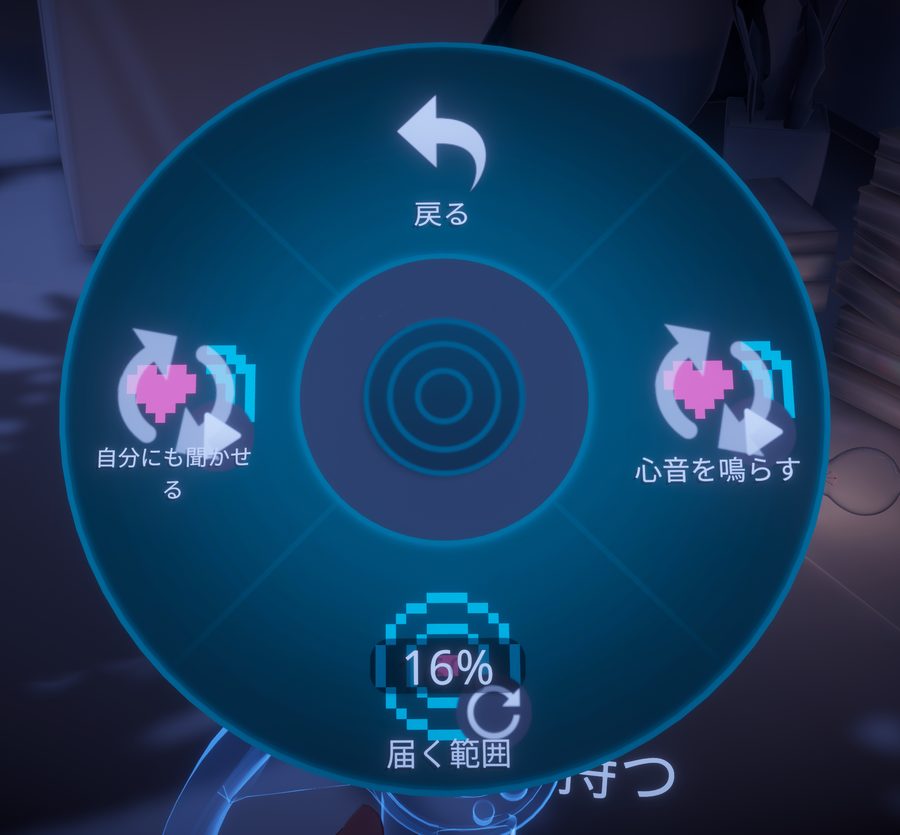
心音のサブメニュー。鳴らすかどうか、届く範囲、自分にも聞かせるかを切り替えます。
The heartbeat sound submenu: play it, how far it carries, and whether you hear it yourself.
♥パルスタトゥーPulse tattoo
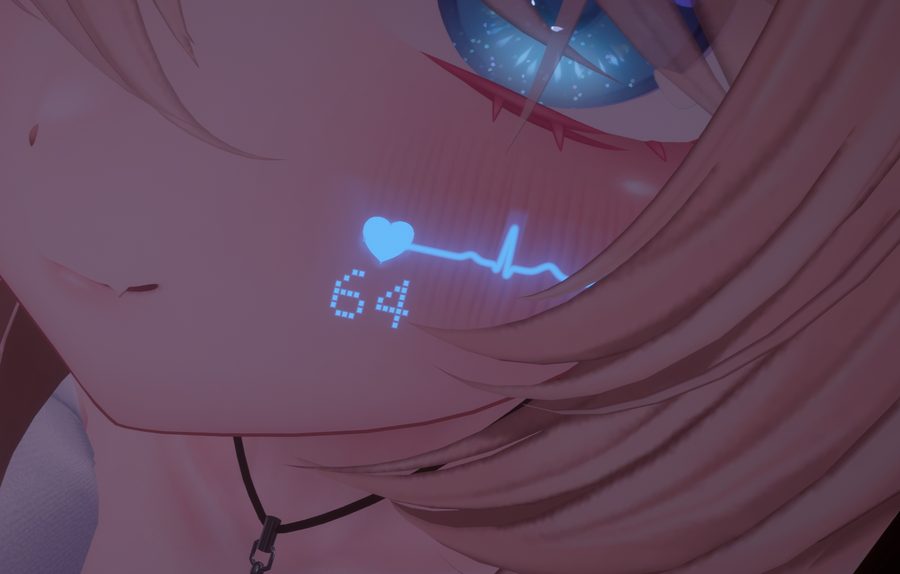
頬で光る心電図です。流れる波形・拍動するハート・心拍数の数字の3つを個別にON/OFFでき、色も数字の書体も自由に変えられます(変え方はこちら)。
Headボーンに追従しているので、頬以外(首筋・腕など)へ移すこともできます。
A glowing ECG on your cheek. The scrolling waveform, the beating heart and the bpm number each toggle independently, and both the colors and the digit font are yours to change (how to change them).
It follows the Head bone, so you can move it somewhere else — neck, arm, anywhere.
♥手動心拍 — 心拍計が無くても使えますManual HR — no monitor required
メニューのラジアルを回すと、50〜180bpmの好きな値を表示できます。実際の心拍のように±3ほど自然に揺れるので、止まった数字には見えません。心拍計を手に入れたら、0に戻すだけで自動に切り替わります。
Turn the radial and show any value from 50 to 180 bpm. It drifts by about ±3 the way a real pulse does, so it never looks like a frozen number. When you do get a monitor, set it back to 0 and it switches to the real thing.
動作に必要なものRequirements
- VRCSDK3 (Avatars) と Modular Avatar 1.10以降 — 組み込みは全自動です
- lilToon — 本体マテリアルに使用
-
心拍を送るソフト — 無料のものもあります。環境に合う選び方は心拍のつなぎかた(図解つき・5ルート)へ。OSCで
HR(整数)を送れるツールならどれでも使えます。VRCOSC経由にも対応: べこのみせ様のVRC Heart Rate・なめらか心音ギミックをお使いの環境なら、そのままで表示されます。心拍計が無い場合も、メニューの「手動心拍」で数値を表示できます - Bluetooth対応の心拍計 — 例: Polar H10 / COOSPO HW9 / Mi Bandシリーズ(Mi Bandはバンド本体の「設定 → 心拍数を共有」をON)。手動心拍だけで使う場合は不要です
- XSOverlay(バッテリー表示をする場合のみ・任意) — 無くても心拍などは問題なく動きます。※Quest / Picoなどスタンドアロン機では、接続方法(Link / AirLink / Steam Link / Virtual Desktop等)を問わずコントローラーの残量を取得できません。トラッカー(Vive Tracker等)は表示できます。ヘッドセット本体の残量はSteam Link / Virtual Desktop接続+XSOverlayベータ版なら表示できます(v2.3)
- VRCSDK3 (Avatars) and Modular Avatar 1.10+ — integration is fully automatic
- lilToon — used by the body material
-
A heart rate app that sends OSC — free options exist; pick your route on Choose your connection (5 routes, illustrated). Any tool that sends
HR(integer) over OSC works. VRCOSC is also supported: if you already use VRC Heart Rate / the Smooth Heartbeat gimmick (BekoShop), it works as-is. No monitor? The 手動心拍 (Manual HR) menu can show any value - A Bluetooth heart rate monitor — e.g. Polar H10 / COOSPO HW9 / Mi Band series (on the Mi Band, turn on "Share heart rate" in the band's own settings). Not needed if you only use Manual HR
- XSOverlay (only for the battery page — optional). Everything else works without it. * On standalone headsets (Quest / Pico), controller battery cannot be read with any connection method (Link / AirLink / Steam Link / Virtual Desktop). Trackers (Vive Tracker etc.) do work. The headset's own battery can be shown when streaming via Steam Link / Virtual Desktop with the XSOverlay beta (v2.3)
導入するInstall
対応アバターなら、置くだけで終わりです。(Unity内のアセット名は HRPendant です)
For supported avatars it is literally drag & drop. (The asset name inside Unity is HRPendant.)
- unitypackageをプロジェクトに読み込む
- アバターの一番上(ルート)に
Assets/NINOVELLIR/HRPendant/Avatars/HRPendant_<アバター名>.prefabをドラッグして子にする - そのままアップロード — Modular Avatarが自動で組み込みます
- Import the unitypackage into your project
- Drag
Assets/NINOVELLIR/HRPendant/Avatars/HRPendant_<AvatarName>.prefabonto the root of your avatar (as a child) - Upload — Modular Avatar does the rest automatically
調整済みアバター(17体)Pre-fitted avatars (17)
 愛莉Kyubi closet
 しなのポンデロニウム研究所
 ルルネIKUSIA
 瑞希IKUSIA
 輝夜IKUSIA
 ミルフィぷらすわん
 ミルティナDOLOSart
 まよChocolate rice
 マヌカSTUDIO JINGO
 プラムあまとうさぎ
 ショコラあまとうさぎ
 シフォンあまとうさぎ
 ライムあまとうさぎ
 クマリSTUDIO JINGO
 エクsep-neko-ya
 ラムネえも研
 いちごはみにの立体箱
絵は各アバター用のSDドット絵で、ペンダントの画像ページにプリセットされています。タイルをクリックすると各アバターのBoothページが開きます。
Each tile shows the chibi pixel art preset on that avatar's picture page. Click a tile to open the avatar's Booth page.
リストにないアバターへの位置合わせFitting unsupported avatars
未対応のアバターでも使えます。Prefabを置いて、位置を手で合わせてください。
- アバターのルート直下に
Assets/NINOVELLIR/HRPendant/HRPendant.prefabを置く - 下の4箇所を調整する
- HRPendant(本体) … 大まかな位置とスケールを合わせる
- wire(紐) … 拡大縮小・回転で首の位置に合わせる
-
必要であれば …
NL_BodyCollider(ペンダントが乗る胸の面)、NL_PullTab(掴む位置)、chain1(鎖の角度)を調整
ペンダントが体に埋まるときは本体を前に出すか NL_BodyCollider を体の表面へ。掴みにくいときはメニューの「ページ切替」を使えば問題ありません。
Tools > NINOVELLIR > HRPendant > Fit Window の「自動フィット」で大まかな位置を出してから始めることもできます。調整値は「プロファイルに保存」で残せます。
Any avatar can wear it. Place the prefab and align it by hand.
- Put
Assets/NINOVELLIR/HRPendant/HRPendant.prefabdirectly under the avatar root - Adjust the four spots below
- HRPendant (root) … rough position and scale
- wire … scale / rotate to fit the neck
-
If needed …
NL_BodyCollider(the chest plane the pendant rests on),NL_PullTab(grab point),chain1(chain angle)
If the pendant sinks into the body, move it forward or bring NL_BodyCollider to the body surface. If it is hard to grab, just use the page-select menu instead.
You can also start from the auto-fit in Tools > NINOVELLIR > HRPendant > Fit Window, then fine-tune. Save your adjustments as a profile from the same window.
画面に自分の絵を出すShowing your own picture
画像ページには好きな絵を表示できます。コマの区切りは自動で読み取るので、画像を選んでメニューを押すだけです。
- PNGをプロジェクトにドラッグする
- Projectウィンドウでその画像を選ぶ
-
Tools > NINOVELLIR > HRPendant > 画面の画像を入れるを実行 — 大きさ・コマ数・インポート設定を自動で合わせます
- コマを横一列に並べ、間を黒く空けておけば 2〜8コマのアニメとして読み取ります
- 1枚絵ならゆっくり縦に揺れる4コマに変換します
- 画面は実寸2.8cm。細部は消えるので粗いドット絵が向いています。黒い部分は背景の星空が透けます
- 速さは
Custom FPS、大きさ・位置はCustom Scale / Offsetで微調整できます
The picture page shows any image you like. Frame boundaries are detected automatically — just select the image and run the menu item.
- Drag a PNG into your project
- Select it in the Project window
- Run
Tools > NINOVELLIR > HRPendant > 画面の画像を入れる("Insert screen image") — size, frame count and import settings are fixed automatically
- Put frames in a horizontal row with black gaps and it is read as a 2–8 frame animation
- A single image is converted into a gently bobbing 4-frame loop
- The screen is 2.8 cm across — chunky pixel art works best. Black areas let the starfield background show through
- Fine-tune speed with
Custom FPS, size/position withCustom Scale / Offset
パルスタトゥーの色と書体を変えるChanging the pulse tattoo's colors and font
見た目はすべて1つのマテリアルで決まります。Assets/NINOVELLIR/HRPendant/System/NL_TattooMat.mat をProjectウィンドウで選び、Inspectorで変更してください。Unity上ではすぐに見た目が変わります。VRChatに反映するには、アバターをアップロードし直してください。
色を変える
- ECG Line Color … 波形の色
- Heart Color … ハートの色
- Number Color … 数字の色(v2.3から数字だけ別の色にできます)
3つに同じ色を入れれば、波形もハートも数字も完全に同じ色で光ります。既定は3要素とも淡い青白系で、製品画像と同じ配色です。
暗いワールドで白飛びする、逆に明るいワールドで見えない、というときは Glow(にじみの広がり・既定0.6。上げすぎは輪郭が汚れて見える原因になります)と Opacity(不透明度・既定0.87)、Emission(発光の強さ・既定1.5。Bloomのあるワールドで光ります)で調整してください。
Emissionを上げるほど発光は強くなりますが、色の明るい部分が白く飛びます(細い線ほど白く見えやすい仕様です)。濃い色をはっきり見せたいときはEmissionを1.0近くまで下げてください。
数字の書体を変える
Number Font から3種類選べます。
- Seg … 7セグメント表示(既定)。デジタル時計のような直線的な書体
- PixelDot … ドットマトリクス。ペンダントの画面と質感を揃えたいときに
- Round … 角の丸い書体。柔らかい印象になります
表示する要素を選ぶ
3つの要素は個別に消せます。数字だけ、波形だけ、といった構成にできます。
- Show ECG Line … 流れる波形
- Show Heart … 拍動するハート
- Show Number … 心拍数の数字
形を整える
- Wave Amplitude … 波形の振幅(既定0.16)。大きいほど山が高くなります
- Line Width … 線の太さ(既定0.0336)
- Heart Size … ハートの大きさ(0.5〜2倍)
- Waves Visible … 画面内に見える波の数(既定約1.7)
- Pulse Boost … 拍動に合わせた明滅の強さ(既定0.65)
- Plane Aspect … Planeの横縦比(既定2.06=ほぼ2:1)。NL_Tattooのスケールの縦横比を変えたときだけ、同じ比率に合わせてください。合っていないと波形や数字が歪みます
位置を変える・アバターごとに色を変える
- 位置や大きさは、アバター内の
NL_Tattooを動かすだけです - 頬以外(首筋・腕など)に貼りたいときは、
NL_Tattooの MA Bone Proxy のターゲットを好きなボーンに変えてください - アバターごとに違う色にしたいときは、
NL_TattooMat.matを複製して名前を変え、そのアバターのPrefab内のNL_TattooのMesh Rendererに割り当ててください(複製しないと、全アバターの色が一緒に変わります)
Everything about its look lives in one material. Select Assets/NINOVELLIR/HRPendant/System/NL_TattooMat.mat in the Project window and edit it in the Inspector. You see the change in Unity right away; re-upload your avatar to see it in VRChat.
Colors
- ECG Line Color — the waveform
- Heart Color — the heart
- Number Color — the number (separate from the line since v2.3)
Set all three to the same color and the waveform, heart and number glow in exactly that color. The default is a pale ice-blue on all three — the same look as the product images.
If it blows out in dark worlds, or disappears in bright ones, tune Glow (spread of the halo, default 0.6 — too much makes the edges look dirty), Opacity (default 0.87) and Emission (brightness boost, default 1.5; blooms in worlds with Bloom).
Higher Emission means stronger glow, but bright parts of the color clip toward white (thin lines show it first). To keep a saturated color looking saturated, lower Emission toward 1.0.
Digit font
Pick one of three under Number Font.
- Seg — seven-segment (default), the straight-edged digital-clock look
- PixelDot — dot matrix, to match the pendant screen's texture
- Round — rounded corners, a softer feel
Choosing which parts show
All three elements toggle separately, so you can wear just the number, or just the waveform.
- Show ECG Line — the scrolling waveform
- Show Heart — the beating heart
- Show Number — the bpm number
Shape
- Wave Amplitude — waveform height (default 0.16)
- Line Width — stroke width (default 0.0336)
- Heart Size — heart size (0.5–2x)
- Waves Visible — how many beats fit across (default ~1.7)
- Pulse Boost — how strongly it flashes on each beat (default 0.65)
-
Plane Aspect — the plane's width:height ratio (default 2.06, roughly 2:1). Only change this if you change
NL_Tattoo's scale ratio — match the two or the waveform and digits will look stretched
Moving it, and per-avatar colors
- To reposition or resize, just move
NL_Tattooin your avatar - To wear it somewhere other than the cheek (neck, arm...), change the target of
NL_Tattoo's MA Bone Proxy to any bone - For a different color per avatar, duplicate
NL_TattooMat.mat, rename it, and assign the copy to the Mesh Renderer on that avatar'sNL_Tattoo. Without duplicating, every avatar changes color together
データを送る設定Sending data (OSC)
心拍
はじめての方は、スクショつきのつなぎかた一覧からどうぞ。無料ルートを含む5つの方法から選べます。
心拍計の心拍をOSCでVRChatへ送るアプリ(Pulsoid / VRCOSC / HeartOSCなど)を設定し、VRChat側はアクションメニューでOSCをONにするだけ。心拍が届き始めると、ペンダントは自動で心拍ページに切り替わります。
一覧にないツールでも、OSCで HR(整数の心拍数)またはVRCOSC形式を送れるものならそのまま使えます。
バッテリー — XSOverlay(任意)
XSOverlayは標準でOSC送信が有効になっているため(送信先ポート9000=VRChatの受信ポート)、特別な設定は不要です。XSOverlayを起動してVRChat側のOSCがONなら、leftControllerBattery などが自動で届きます。
v2.3からヘッドセット本体の残量(hmdBattery)にも対応しました。XSOverlayのベータ版以降が送信します。
届かない場合は、XSOverlayの ExternalMessageAPIConfig.json で送信ポートが変更されていないか確認してください(変更後はXSOverlayの再起動が必要です)。
Quest / Picoなどスタンドアロン機では、接続方法(Link / AirLink / Steam Link / Virtual Desktop等)を問わずコントローラーの残量を取得できません(メーカーがアプリに残量情報を公開していないため。どのツールでも同じです)。トラッカー(Vive Tracker等)はPCに直接接続されるため表示できます。ヘッドセット本体の残量は Steam Link / Virtual Desktop 接続なら取得できます(Meta公式の Link / AirLink では取得できません)。詳しくはよくある質問をご覧ください。
Heart rate
First time? Start from Choose your connection — 5 routes with screenshots, free ones included.
Set up an app that sends your monitor's heart rate to VRChat over OSC (Pulsoid / VRCOSC / HeartOSC etc.), then just turn OSC on in VRChat's Action Menu. As soon as heart rate arrives, the pendant switches to the heart rate page automatically.
Tools not on the list work too, as long as they send HR (integer bpm) or the VRCOSC format over OSC.
Battery — XSOverlay (optional)
XSOverlay sends OSC by default (to port 9000, VRChat's receive port), so no setup is needed. With XSOverlay running and VRChat OSC on, leftControllerBattery etc. arrive automatically.
v2.3 adds the headset's own battery (hmdBattery), sent by XSOverlay's beta version and later.
If nothing arrives, check that the send port in XSOverlay's ExternalMessageAPIConfig.json has not been changed (restart XSOverlay after edits).
On standalone headsets (Quest / Pico), controller battery cannot be read with any connection method (Link / AirLink / Steam Link / Virtual Desktop) — the vendor does not expose it to apps, so this applies to every tool. Trackers (Vive Tracker etc.) connect directly to the PC and do work. The headset's own battery CAN be read when streaming via Steam Link / Virtual Desktop (not via Meta's official Link / AirLink). See the FAQ for details.
よくある質問(トラブルシューティング)FAQ / Troubleshooting
心拍ページが表示されない
心拍のデータが届いていないと、引っ張り切替では心拍ページがスキップされ、メニューから選んでも0のままになります。順に確認してください。
- Pulsoid側で心拍が取れているか(アプリ / Pulsoid Desktop の画面で数値が動いているか)
- 心拍をVRChatへ送るOSC連携ツールが起動しているか → データを送る設定
- VRChatのOSCが有効か(アクションメニュー → Options → OSC → Enabled)
- アバターを更新した直後は古い設定が残って届かないことがあります → 下の「OSC設定のリセット」
- 心音ギミックなど他の心拍ギミックでは表示されるのに、PIXEL PULSEだけ表示されない場合も原因は同じです → 下の「OSC設定のリセット」で直ります
- メニューの「手動心拍」が0以外になっていると、実際の心拍は表示されません(手動値が優先されます)。0に戻すと自動に戻ります
Pulsoid以外のツールでも、パラメータ名 HR(整数)で送れば表示できます。v1.4からはVRCOSC経由(VRCOSC/Heartrate/Value)にも対応しています — べこのみせ様のVRC Heart Rate・なめらか心音ギミックと同じ環境がそのまま使えます。
バッテリーページが表示されない
- バッテリー表示はXSOverlayを使っている場合のみです。使っていなければ出ないのが正常です(心拍などは問題なく動きます)
- XSOverlayが起動しているか。OSC送信は標準で有効です(設定ファイルを変更した場合は
ExternalMessageAPIConfig.jsonを確認して再起動) - コントローラー / トラッカーの電源が入っているか(スリープ中は送られません)
- VRChatのOSCが有効か(上と同じ)
- Quest / Picoなどスタンドアロン機では、接続方法(Link / AirLink / Steam Link / Virtual Desktop等)を問わず、コントローラーの残量は表示できません。メーカーがアプリに残量情報を公開していないためで、XSOverlay以外のどのツールでも同じです。トラッカー(Vive Tracker等)はPCに直接接続されるため、Quest / Picoでも表示できます
- ヘッドセット本体の残量(v2.3)は、XSOverlayのベータ版以降+Steam Link / Virtual Desktop接続のときだけ表示されます(Meta公式の Link / AirLink では取得できません)。表示されない場合はこの条件を確認してください
心拍もバッテリーも両方見れない(水槽と画像だけになる)
両方とも届かないときは、ペンダントではなくOSCの根元が原因です。
- VRChatのOSCが無効になっている(いちばん多い原因)→ アクションメニュー → Options → OSC → Enabled
-
OSC設定のリセット: アバターの更新後などに古い設定が残ると、OSCが有効でも届かないことがあります。アクションメニューの OSC → Reset Config を実行してください(またはVRChatを終了し、
%USERPROFILE%\AppData\LocalLow\VRChat\VRChat\OSCの中身を削除してから再起動) - まれにファイアウォールがOSC(UDP)を止めていることがあります
メニューに「PIXEL PULSE」が出ない
- Modular Avatar が未導入、またはバージョンが古い(1.10未満)→ VCC / ALCOM で導入・更新してください
- Prefabがアバターの階層内に入っているか確認してください(シーン直置きでは組み込まれません)
引っ張っても反応しない
- 掴めるのはペンダント付近(NL_PullTab を中心とした半径3.5cmの球)だけです。鎖や紐は掴めません
- 2cmほど引っ張ってから離すと切り替わります(カチッと音が鳴れば成功)
- 髪や服のPhysBoneが先に掴まれてしまう場合は、
NL_PullTabを体から離すか、NL_PullRootのPhysBoneのRadiusを大きくしてください - デスクトップモードでも掴めますが狙いにくいため、メニューの「ページ切替」が確実です
勝手にページが切り替わる
- 髪や服を触ったときに、一緒にタブを掴んでしまっています。
NL_PullRootのPhysBoneの Radius を小さくするか、Allow Grabbing をオフにしてメニュー専用にするのが確実です
ピンク色になる(マテリアルエラー)
- 本体・鎖・紐がピンク → lilToon未導入です。VCC / ALCOM でlilToonを追加してください(古すぎる場合も起きます。最新版へ)
- 画面だけピンク → 同梱シェーダーの読み込みに失敗しています。
Model/NLScreen7Seg.shaderを右クリック → Reimport(直らなければunitypackageを入れ直し)
ペンダントが荒ぶる・跳ね回る
静止位置が体に埋まっていると、コライダーが押し出そうとして暴れます。
- HRPendant本体を少し前(体の外)へ出す
-
NL_BodyColliderを体の表面の位置・向きに合わせる - メニューの「本体サイズ」を少し大きくすると埋まりが解消することがあります
- アバター側の胸などのPhysBoneコライダーと重なっている場合は、干渉しない位置へずらしてください
ペンダントが服に埋まって見えない
- HRPendant本体を前に出してください。フィットの基準は素体なので、厚手の衣装では前に出す調整が必要なことがあります → 位置合わせ
画面が暗い・消えているように見える
- メニューの「画面の明るさ」が絞られていないか確認してください(暗所用に下げたまま忘れがちです)
- 「ネックレス表示」がオフになっていないかも確認を
メニューで心拍やバッテリーを選んでも、水槽の画面に戻ってしまう
以前のバージョンの仕様です。v1.2.1から、メニューで選んだページはスキップされなくなりました(Boothから最新版に更新してください)。引っ張り切替のときは、従来どおりデータの無いページを自動で飛ばします。
なお、更新後もデータが無いページは0表示のままです。
- 心拍ページを見たい → 上の「心拍ページが表示されない」の手順でデータを届かせるか、心拍計が無ければメニューの「手動心拍」を使ってください
- バッテリーページを見たい → XSOverlayの起動が必要です(上の「バッテリーページが表示されない」参照)
心拍計を持っていなくても使える?
- 使えます。メニューの「手動心拍」ラジアルを回すと、50〜180bpmの好きな値を表示できます。実際の心拍のように±3ほど揺れます。0に戻すとOSC(自動)に戻ります。設定はワールドを移動しても保存されるので、あとから心拍計を使うときは0に戻し忘れにご注意ください(0以外の間は手動値が優先されます)
- 水槽・画像ページは心拍計と無関係に動作します
心音が自分には聞こえない
仕様です。既定では心音は周囲の人にだけ聞こえます(なめらか心音ギミック等と同じ考え方です)。自分でも聞きたい場合は、メニューの心音サブメニューで「自分にも聞かせる」をONにしてください(ローカル設定なので、他の人の聞こえ方には影響しません)。
メニュー操作で他のギミックが一瞬光る・アバターが一瞬揺れ直す
LightLimitChangerなどとの併用時に起きる、Write Defaults(WD)の既知の相性問題です。v1.3で内部構造を全面的に見直し、PIXEL PULSEの操作がきっかけで起きるものは解消しました(Boothから最新版に更新してください)。
- 更新後も他のギミックの操作で同じ現象が起きる場合は、アバター側のWD構成の問題です。各ギミックを最新版で入れ直すか、WD設定を統一すると改善します
パラメータ圧縮ツールを入れたら、他の人から心拍が見えなくなった
VRC Parameter Compressor などの圧縮ツールは、Int/Floatの同期パラメータを順番に送り直す仕組みのため、毎秒変わり続ける心拍(NL/HR)が他の人へ届かなくなります。本人はOSCを直接読むため正常に見えるのが特徴です(数値も心音も、他人視点でだけ止まります)。フェイストラッキング等の導入自体は原因ではありません。
- 圧縮ツールの除外設定に
NL/HRを追加して再アップロードしてください。NL/で始まるパラメータをすべて除外すると最も確実です - v2.1以降はメニュー系パラメータが圧縮対象にならない形式になったため、除外が必要なのは実質
NL/HRだけです(Boothから最新版に更新してください。同期使用量も67bit→31bitに減っています)
Quest単体(Android)で使える?
- PCアバター専用です。専用シェーダーを使っているため、Quest / Android向けアバターでは表示できません
The heart rate page does not show
Without heart rate data, tug-switching skips the page, and selecting it from the menu shows 0. Check in order:
- Is Pulsoid actually receiving your pulse? (numbers moving in the app / Pulsoid Desktop)
- Is the OSC bridge tool that sends it to VRChat running? → Sending data
- Is VRChat OSC enabled? (Action Menu → Options → OSC → Enabled)
- Right after updating an avatar, stale OSC config can block new parameters → see "Resetting OSC config" below
- Other heart rate gimmicks work but PIXEL PULSE does not? Same cause → "Resetting OSC config" below fixes it
- If the 手動心拍 (Manual HR) radial is not 0, the real heart rate is overridden. Set it back to 0
Any tool sending HR (integer) works. Since v1.4, VRCOSC (VRCOSC/Heartrate/Value) is also supported — the same environment as VRC Heart Rate / the Smooth Heartbeat gimmick works as-is.
The battery page does not show
- Battery display only works with XSOverlay. Without it, the page simply never appears (everything else still works)
- Is XSOverlay running? OSC sending is on by default (if you edited
ExternalMessageAPIConfig.json, check it and restart) - Are your controllers / trackers awake? (nothing is sent while they sleep)
- Is VRChat OSC enabled? (same as above)
- On standalone headsets (Quest / Pico), controller battery cannot be shown with any connection method (Link / AirLink / Steam Link / Virtual Desktop) — the vendor does not expose it to apps, regardless of tool. Trackers (Vive Tracker etc.) connect directly to the PC and do work
- The headset battery row (v2.3) shows only with the XSOverlay beta or later AND when streaming via Steam Link / Virtual Desktop (Meta's official Link / AirLink does not expose it). Check both if the row stays empty
Neither heart rate nor battery shows (only aquarium and picture)
If both are missing, the problem is at the OSC root, not the pendant.
- VRChat OSC is disabled (the most common cause) → Action Menu → Options → OSC → Enabled
-
Resetting OSC config: stale per-avatar config can block parameters even with OSC on. Run Action Menu → OSC → Reset Config (or quit VRChat, delete the contents of
%USERPROFILE%\AppData\LocalLow\VRChat\VRChat\OSC, and restart) - Rarely, a firewall blocks OSC (UDP)
"PIXEL PULSE" is missing from the menu
- Modular Avatar is missing or too old (below 1.10) → install / update via VCC / ALCOM
- Make sure the prefab is inside the avatar's hierarchy (not loose in the scene)
Tugging does nothing
- Only a 3.5 cm sphere around
NL_PullTab(near the pendant) is grabbable — not the chain or wire - Pull about 2 cm and release (a click sound means success)
- If hair/clothing PhysBones get grabbed first, move
NL_PullTabaway from the body or enlarge the PhysBone radius onNL_PullRoot - Desktop mode can grab too but it is fiddly — the page-select menu is the reliable way
Pages switch on their own
- You are grabbing the tab together with hair/clothes. Shrink the PhysBone Radius on
NL_PullRoot, or turn off Allow Grabbing and use the menu only
Everything is pink (material error)
- Body / chain / wire pink → lilToon is missing. Add it via VCC / ALCOM (a very old version can also cause this — update)
- Only the screen pink → the bundled shader failed to import. Right-click
Model/NLScreen7Seg.shader→ Reimport (or reimport the unitypackage)
The pendant flails around
If its resting position is inside the body, the collider keeps pushing it out.
- Move the HRPendant root slightly forward (out of the body)
- Align
NL_BodyColliderwith the body surface - Enlarging 本体サイズ (pendant size) in the menu can also clear the overlap
- If it overlaps the avatar's own chest PhysBone colliders, move it clear of them
The pendant is buried in clothing
- Move the HRPendant root forward. Fitting targets the bare body, so thick outfits may need it → Fitting
The screen looks dark or off
- Check the 画面の明るさ (screen brightness) radial — easy to forget after dimming it for a dark world
- Also check that ネックレス表示 (necklace visibility) is not off
Selecting heart rate / battery from the menu bounces back to the aquarium
That was old behavior. Since v1.2.1, menu-selected pages are never skipped (update from Booth). Tug-switching still skips pages with no data, as before.
Note that pages without data still show 0 after updating.
- Want the heart rate page → get data flowing per "The heart rate page does not show", or use 手動心拍 (Manual HR) if you have no monitor
- Want the battery page → XSOverlay must be running (see above)
Can I use it without a heart rate monitor?
- Yes. Turn the 手動心拍 (Manual HR) radial to show any value from 50–180 bpm, with a natural ±3 wobble. Set it to 0 to return to OSC (auto). The setting persists across worlds, so if you later get a monitor, remember to set it back to 0 — while non-zero it overrides your real heart rate
- The aquarium and picture pages never needed a monitor in the first place
I cannot hear my own heartbeat sound
By design. By default the heartbeat sound is heard only by people around you (same philosophy as the Smooth Heartbeat gimmick). To hear it yourself, turn on 自分にも聞かせる ("also hear it yourself") in the 心音 (heartbeat) submenu — it is a local setting and does not affect what others hear.
Other gimmicks flash / the avatar twitches when I use the menu
A known Write Defaults (WD) compatibility issue when combined with LightLimitChanger and similar. v1.3 reworked the internals and eliminated the cases triggered by PIXEL PULSE (update from Booth).
- If it still happens when operating other gimmicks, your avatar's WD setup is mixed — reinstall those gimmicks with their latest versions or unify WD settings
After adding a parameter compressor, others can't see my heart rate
Parameter compression tools (e.g. VRC Parameter Compressor) re-send Int/Float synced parameters one at a time in rotation, so the constantly-changing heart rate (NL/HR) stops reaching other players. It still looks fine to you because your own client reads OSC directly — the number and the heartbeat sound freeze only from other people's view. Face tracking itself is not the cause.
-
Add
NL/HRto the compressor's exclusion list and re-upload. Excluding every parameter starting withNL/is the safest - From v2.1 the menu parameters use a format compressors leave alone, so
NL/HRis effectively the only one you need to exclude (update from Booth — sync usage also dropped from 67 to 31 bits)
Does it work on Quest standalone (Android)?
- PC avatars only. It uses custom shaders, which Android avatars do not allow
仕様Specifications
Expression Menu
| 項目 | 内容 |
|---|---|
| ネックレス表示 | 鎖・紐・ペンダントの表示ON/OFF。心音とタトゥーは消えません(タトゥーだけ着ける、もできます) |
| タトゥー | 頬の発光心電図タトゥーの表示(既定OFF)。色・書体の変え方 |
| 心音 | サブメニュー: 鳴らす(既定OFF)/届く範囲(密着15cm〜12m、16段・既定は25cm)/自分にも聞かせる(既定では自分には聞こえません・ローカル設定) |
| 手動心拍 | ラジアル。心拍計が無くても50〜180bpmの好きな値を表示できます(±3のゆらぎつき。0でOSC自動に戻ります。設定はワールド移動後も保存されます。0以外の間は実際の心拍より優先されます) |
| 画面の明るさ | ラジアル。暗いワールド用に絞れます |
| 本体サイズ | ラジアル。0.6〜1.4倍(既定0.88倍) |
| ページ切替 | 心拍 / バッテリー / 水槽 / 画像 を直接選択(掴みにくい時はこちらが確実) |
| Item (JP label) | Description |
|---|---|
| ネックレス表示 | Necklace visibility (chain, wire, pendant). Heartbeat sound and the tattoo stay — you can wear the tattoo alone |
| タトゥー | Glowing ECG tattoo on the cheek (default OFF). Changing colors and font |
| 心音 | Heartbeat sound submenu: play (default OFF) / audible range (intimate 15 cm to 12 m, 16 steps, default 25 cm) / also hear it yourself (off by default, local) |
| 手動心拍 | Manual HR radial: show 50–180 bpm without a monitor (±3 wobble; 0 returns to OSC auto; saved across worlds; overrides the real heart rate while non-zero) |
| 画面の明るさ | Screen brightness radial, for dark worlds |
| 本体サイズ | Pendant size radial, 0.6–1.4x (default 0.88x) |
| ページ切替 | Page select: heart rate / battery / aquarium / picture (the reliable way when grabbing is hard) |
パラメータParameters
| パラメータ | 型 | 同期 | 内容 |
|---|---|---|---|
NL/M0・M1 |
Bool×2 | 2bit | 表示ページ(4ページを2bitで) |
NL/HR |
Int | 8bit | 心拍数(他の人にも見えます) |
NL/L・R・T・H ×3 |
Bool×12 | 12bit | バッテリー残量(左手・右手・トラッカー・HMD)各8段(他の人にも見えます) |
NL/Enable |
Bool | 1bit | 表示ON/OFF |
NL/B・S ×3 |
Bool×6 | 6bit | 明るさ・サイズ 各8段 |
NL/Beat・G ×4 |
Bool×5 | 5bit | 心音のON/OFF・届く範囲 16段 |
NL/Tattoo |
Bool | 1bit | タトゥー表示 |
NL/ManualHR |
Float | 0bit | 手動心拍(非同期。装着者側でNL/HRに変換) |
NL/ListenOwn |
Bool | 0bit | 自分にも心音を聞かせる(ローカル) |
HR ほか受信用×7 |
— | 0bit | OSC受信専用(非同期) |
| Parameter | Type | Sync | Description |
|---|---|---|---|
NL/M0・M1 |
Bool×2 | 2bit | Current page (4 pages in 2 bits) |
NL/HR |
Int | 8bit | Heart rate (visible to others) |
NL/L・R・T・H ×3 |
Bool×12 | 12bit | Battery levels (left / right / trackers / HMD), 8 steps each (visible to others) |
NL/Enable |
Bool | 1bit | Visibility |
NL/B・S ×3 |
Bool×6 | 6bit | Brightness / size, 8 steps each |
NL/Beat・G ×4 |
Bool×5 | 5bit | Heartbeat sound on/off, range in 16 steps |
NL/Tattoo |
Bool | 1bit | Tattoo visibility |
NL/ManualHR |
Float | 0bit | Manual HR (non-synced; converted to NL/HR on the wearer) |
NL/ListenOwn |
Bool | 0bit | Hear own heartbeat (local) |
HR and 6 more inputs |
— | 0bit | OSC receive only (non-synced) |
同期パラメータ合計 35bit(v2.1で67bitから半減、v2.3のHMDバッテリー対応で+3bit)。掴んで引っ張る切替はPhysBoneのローカルシミュレーションを使うため、追加の同期コストはありません。
Synced parameters total 35 bits (halved from 67 in v2.1, +3 for the v2.3 HMD battery). Tug-switching uses PhysBone's local simulation, so it adds no sync cost.
注意事項Notes
- 本体・チェーン・紐は1つのマテリアル(
Model/HRPendant_Body.mat)です。色替えは複製してから - ペンダントはPhysBoneで揺れます。
NL_BodyColliderを消すと体に埋まります - 心拍・バッテリーの数値は同期されるため、周囲の人にも見えます。見せたくない時はメニューで表示をOFFに
- Body, chain and wire share one material (
Model/HRPendant_Body.mat). Duplicate it before recoloring - The pendant swings with PhysBones. Removing
NL_BodyCollidermakes it sink into the body - Heart rate and battery values are synced and visible to others. Turn visibility off in the menu if you prefer not to show them